Sunday, 29 April 2012

iPhone 5 Concept Features

Amazing Concept iPhone 5. This CG iPhone 5 has advanced iPhone features such as a sleeker iPhone design, a laser keyboard & holographic display all rolled into this iPhone 5 video. 

The computer generated Concept iPhone 5 features is an exponential leap from the iPhone 4S with Siri, iPhone 4 or iPhone 3gs of today.

We hope you enjoy this iPhone 5 video more than the current trend of iPhone 5 rumors such as iPhone 5 leaked and iPhone 5 unboxing videos. Apple is yet to make the iPhone 5 announcement. So have your fill of this new iPhone video before the iPhone 5 release.


See it in action!


Watch As Siri “Self-Destruct” Feature Hits After Incorrect Passcode [VIDEO]


Since arriving as one of the main features of the iPhone 4S and iOS 5, Siri has certainly had its ups and downs, and while some have manipulated it to detect brain waves and perform other weird and wonderful tricks, others have opted to sue Apple, disappointed by the poor performance of the system-wide voice recognition software.

Aside from the EEG brainwave detection, we’ve even seen developers and modders use Siri to start cars, and to add to the list of appealing, yet unlikely-to-be-implemented features, the following video shows Siri prompting a concept iPhone 5 into exploding after the password is entered incorrectly a series of times.

siri iphone 5

In what would certainly come as a surprise to an iPhone thief, the screen turns red and then simply explodes, leaving a blank display covered in those dreaded cracks.
While I suspect many would love to have such an option on their own devices incase it should get into the wrong hands, the likelihood of this ever hitting the market is less than impossible. With health and safety regulations becoming more and more stringent moving forward, allowing people to house a mini bomb in their iPhone will certainly not be on the agenda.

Still, it makes for an entertaining video, and I’m sure most of us would love to have the ability to remotely implement this feature should our device become lost or stolen
Sidetracking a little, I couldn’t help but notice how nice that concept iPhone looked. Being only halfway through the iPhone 4S release cycle, information regarding the next installment is pretty scarce. However, there have been many suggestions that Tim Cook’s company will finally deviate from the 3.5" display prevalent in every single iPhone over the past 5 years, so perhaps the depicted device in the video offers an insight as to how it might look?
Some commentators have suggested that Apple needs to increase the size of the display, since so many popular devices from the likes of Samsung are giving consumers more real estate. However, the iPhone continues to reign supreme over its Android-wielding rivals, and with the average thumb unable to comfortably cover a diameter larger than the device’s screen, it remains to be seen whether Apple deems the larger screen to be a necessity.


[Thanks, Thomas Dunn]


Source : Redmond Pie

Root Galaxy S II On Android 4.0.3 ICS With CF-Root [How-To Tutorial]

News of an imminent Ice Cream Sandwich release for the Samsung Galaxy S II has been lingering for the past couple of weeks now, but it would appear those in desperate wait to install Android 4.0.x on their S II have had their prayers answered by Google.

Of course, no sooner does it break, does one of the talented developers acquire the root. Much like the iOS jailbreak community, which saw a jailbreak for iOS 5.1 just hours after Apple announced the release, Android developer Faryaab has created the method, based on Chainfire‘s popular CF-Root tool.

samsung galaxy s2 pwned

As per usual, the scoop comes courtesy of the guys over at XDA Developers – a popular hunt of Android enthusiasts, and we’ve compiled a step-by-step guide for those looking to root their newly ‘Ice Cream Sandwiched’ Samsung Galaxy S II!


DISCLAIMER: As usual, I shall not be held responsible for any loss of data, nor if your device gets damaged in the following of this guide. Proceed at your own risk.

Since the CF-Root tool doesn’t come with a custom recovery like ClockworkMod Recovery, you’ll need to flash it yourself. Please check out our how to flash ClockworkMod Recovery tutorial for more information.

Step 1: Download the required kernel for your Samsung Galaxy S II:
Extract the .zip file.

Step 2: If your device is connected to your computer, please disconnect it.

Step 3: Download and launch ODIN v1.85 [XDA Thread]

Step 4: Click on PDA and select the CF-Root-xxx-vX.X.tar which will be located in the file you extracted in Step 1.

Step 5: Switch off your Galaxy S II, and once it is completely shut down, press and hold Volume Down + Power to place the device into download mode.

Step 6: Once in download mode, connect your Galaxy S II to your computer.

Step 7: Make sure you have not checked the Re-Partition option.

Step 8: Click on START and wait for your device to reboot.


If everything has gone as it should have, your Galaxy S II will now be rooted on Android 4.0.3 Ice Cream Sandwich.

If you have any queries, check out the official thread over on XDA.

How To Jailbreak iOS 5.0.1 On Windows Using Sn0wbreeze 2.8b11 [Guide]

Pod2g’s Corona untethered exploit for iOS 5.0.1 has breathed new life into a jailbreak community which has had little to shout about since the release of iOS 5 just over two months ago.


There isn’t that much gained from using Sn0wbreeze over Redsn0w 5.0.1 jailbreak in terms of jailbreaking. Having said that, developer iH8sn0w has added a fix to the rather annoying iBooks crash as well as reintroducing the ability iPhone 3GS users to flash the 3G iPad’s baseband onto it – allowing an Ultrasn0w unlock to be performed on iOS 5.

Unfortunately, there is currently no untethered jailbreak for iOS 5.x, thus this sn0wbreeze jailbreak – like its Redsn0w cousin – is limited to a tethered boot jailbreak. So if, for whatever reason, your iDevice is switched off (reboot, low battery etc.), you will have to connect to a Windows PC and boot tethered through your chosen jailbreak app in order for it to continue functioning. Not ideal, but we reckon that a tethered jailbreak is better than no jailbreak.

In addition (sorry to be somewhat bleak), if and when an untethered jailbreak does surface, 5.0.1 users will be left out for a while as the next untethered jailbreak is expected to support iOS 5.0 only.iPhone 4S and iPad 2 users are especially advised not to upgrade to 5.0.1 if they want to jailbreak their device in near future.


DISCLAIMER: I shall not be held responsible if you lose data or your device gets damaged in the following of this guide. So as usual, proceed at your own risk.


Anyway, on with the tutorial.
You will need:
  1. A supported device running iOS 5.0.1
  2. The latest version of Sn0wbreeze (version 2.8b11)
Step 1: Once you have downloaded your relevant iOS 5.0.1 IPSW, launch Sn0wbreeze. Click the blue arrow as depicted below.


Step 1: Once you have downloaded your relevant iOS 5.0.1 IPSW, launch Sn0wbreeze. Click the blue arrow as depicted below.


Step 2: Locate the downloaded IPSW fie for your iOS device and click that blue arrow once again.


Step 3: Sn0wbreeze will now display your device’s details on a verification screen. Click the blue arrow, again.


Step 4: Now, if you’re planning to preserve your iPhone’s baseband for Gevey SIM or Ultrasn0w unlock, opt for Expert Mode. Hit the arrow once again.


Step 5: On the next screen, select Build IPSW and click on the blue arrow once again.


Sn0wbreeze will then pwn the iOS 5.0.1 IPSW file. It may take a while, but you’ll notified when the process is done.


Step 6: Connect your device and hit OK, then follow the steps to slip your device into DFU mode. If all goes to plan, you’ll receive a confirmation prompt.


Step 7: Open iTunes, select your device in the list view, and while holding down the left Shift key on your keyboard, hit the Restore button, which will allow you to navigate to your custom firmware file which you created via Sn0wbreeze.


With the process complete, we now need to discuss how to boot tethered.
Step 1: Launch iBooty, which by default should be lying on your desktop, select your device and hitStart.


Step 2: Follow the on-screen instructions (if you need to – you may be a dab-hand by now) to enter your device into DFU mode.


Step 3: iBooty will work its magic, and you will suddenly begin to see life on your device once again. Now you can head over to Cydia and install all your favorite apps and tweaks!


Source : Redmond Pie


How To Root Galaxy Tab 2 7.0 GT-P3110 On Android 4.0.3 ICS


While some Android devices are rooted relatively quickly by those in the know within the modding and development community, some smartphones and tablets can take what seems like an age.
XDA Developers and RootzWiki are undeniably the two most valuable sources when it comes to Google’s mobile OS, and today it’s the turn of the latter to come through with the goods. Member nycbjr has gained root access by using a modified boot.img from a recent GT-P3110 leak. The steps are fairly simple, so follow them carefully and you too could be enjoying a rooted Galaxy Tab in no time.


DISCLAIMER: I shall not be held responsible if you lose data or your device gets damaged in the following of this guide. Furthermore, the dev has noted that it hasn’t been tested extensively, so as usual, proceed at your own risk.


With the formalities out of the way, let’s get on with the tutorial on how you can root the SamsungGalaxy Tab 2 7.0.
You will be using heimdall -  a cross-platform, open-source tool in order to flash the firmware onto your Samsung Galaxy Tab.
Step 1: Download the .zip file of Heimdall [Official Website] and extract using an app like WinRAR or 7-zip.
Step 2: Boot your Samsung Galaxy Tab into Download Mode. To achieve this, power your device down, and then turn it on while holding the Volume Down button.
Step 3: Your device will say Download Mode Do Not Turn Off Target. At this moment, you must connect your phone to your computer with a USB cable.
Step 4: Download the following files:
And then place them in the same place you extracted Heimdall in Step 1.
Step 5: Open a command prompt and locate the folder from Step 1. Then type in adb reboot download
Step 6: Launch heimdall-frontend, and go to the “Flash” tab. Then, load the attached pit file (gt-p3110.pit).
Step 7: In partition details, select “KERNEL”, and then click “Add”
Step 8: Next, choose “Browse” and select the attached boot-bjr.img. Then, click “Start”.
Step 9: After the tablet reboots, type the following into the command prompt:
adb shell
./su
./gtab2-root.sh


And that’s it, your Galaxy Tab should now be rooted!
If you get stuck at any point in time, please check out the official thread over at RootzWiki.


Source : Redmond Pie
Saturday, 28 April 2012

Why Apple Shouldn’t Kill Off The 17-Inch MacBook Pro

While I often ignore the senseless rumors that come from the tomfoolery of tech “analysts”, this latest one claiming that Apple plans to discontinue the 17″ MacBook Pro comes from Ming-Chi Kuo, an analyst with KGI Securities who has gotten some things right about Apple products in the past. Kuo believes that this discontinuation will come as a result of Apple’s convergence of the Apple’s Air and Pro notebook lineups. In Q1 of 2012, Apple sold roughly 3.1 million notebooks. Out of that figure, nearly half of those were of the 13-inch MacBook Pro. Kuo has a bleak estimation of the 17-inch Pro sales figure, however, stating that only 50,000 were sold in that quarter.


macbook pro 17 inch

But what could be the reason behind these low sales? Well, not only is is a pretty costly notebook – ranging from around $2400 for the base model to upwards of $4000, depending on how you configure it – but it is also huge. Most people seek to purchase a laptop for reasons of portability, and 17″ laptops are closer to being classed as an ultraportable all-in-one desktop than a laptop. It is for these two reasons that the 17″ pro appeals mainly to niche buyers; people in professions that require performance laptops and that type of screen estate while on the go. And this is exactly why Apple shouldn’t kill it off, despite diminished sales in contrast to the other laptops, which appeal more to consumers.

macbook pro 17 inch top view

Like I said, the 17″ Pro primarily appeals to niche buyers – graphics designers, video production guys, artists, or simply people who do want big and powerful laptops – shouldn’t be exiled by the company. Sure, many consumers are able to live in the “post-PC” era. That is, most of the tasks that they perform on computers can be done either on tablets such as the iPad, or something that’s relatively not powerful such as the Air. However, content creators are still living in a world where the powerful computer is very much a necessity. And many content creators do turn to Apple for their computing needs; in aforementioned industries such as graphics design and video production, Macs are highly used and touted.

17 inch macbook pro

Nevertheless, this is still a rumor coming from yet another hit-or-miss analyst. But, judging the complete lack of updates when it comes to Apple’s other content-creator oriented line, the Mac Pro, this wouldn’t be all too surprising.


Source : Redmond Pie
How To Use Saved SAM Activation Ticket To Unlock Your iPhone


Apple has reacted quickly to rectify the issue with their activation servers that allowed iPhoneowners to unlock their devices, anyone who didn’t get involved when the process was first announced will unfortunately be left with an iPhone restricted to a single carrier. However, if you are one of the enterprising few who jumped into action right away, then read on to see just what you can do with those saved activation tickets.
For those who jumped onto the SAM unlock bandwagon at an early stage and managed to backup their activation tickets, it is possible to restore the tickets and use them to unlock the iPhone again, something that will be extremely useful in case the user needs to restore the device for one reason or another.


unlock iphone

It is worth noting that you will need a jailbroken device to carry out the process, and your Lockdown folder should be backed up, to a cloud based location such as SkyDrive, Dropbox (recommended) orGoogle Drive. This is something that should have been done immediately after finishing the SAM unlock process. If all of this seems familiar, then take a look below to see how you can restore your activation ticket in order to unlock again after a firmware restore.


Step 1: Locate the SIM card that was used during the initial unlock process. This is the unofficial SIM card, not the SIM that was provided by the official network.

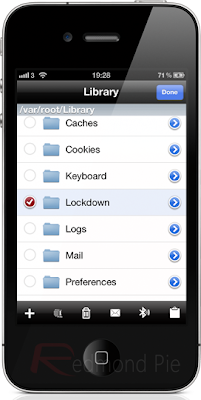
Step 2: Open up the iFile app on your iPhone and use it to navigate to the /var/root/Librarydirectory. If you don’t have iFile installed, it is available as a package from within Cydia with a free limited feature trial.


Step 3: When you are in the directory mentioned above, select the ‘Edit‘ button in the top right hand corner of the iFile user interface. When the directory is in edit mode, select the Lockdown folder.

iphone sam


Step 4: With the Lockdown folder selected, press the zip button to create a compressed file backup of the Lockdown folder. Once the zip file has been created, make sure to name it something that will distinguish it and is rememberable.

Step 5: Scroll to the bottom of the current directory and make sure that your zip file has been created and is available. If it is, then delete the entire Lockdown folder using the trashcan icon.

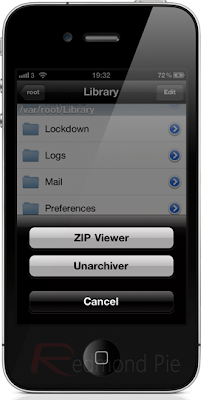
Step 6: Bring up your Dropbox folders and locate the Lockdown folder that contains the valid activation ticket, created by the unofficial SIM card that was used during the unlock process. Open up the recently created zip file using the iFile app once again and select the ‘Unarchiver‘ option.

Step 7: The contents of the zip file will now be extracted and dumped into the default directory, which in most instances is the Documents folder.


unarchiver iphone

Step 8: Once again, select ‘Edit‘ in the top right hand corner of the iFile user interface before selecting Lockdown, and press the clipboard icon which would in turn copy the Lockdown folder. Tap the ‘Done‘ button.

Step 9: Still in iFile, navigate to /var/root/Library and select ‘Edit‘. Select the clipboard icon and then tap ‘Paste‘ before tapping the ‘Done’ button.


Step 10: If you still have the SAMPrefs package installed on the device, then navigate to/User/Library/Preferences and search for SAM. When found, make sure to delete thecom.bingner.sam.plist file if you can find it (it may not exist in some cases). The purpose of this is to make sure that everything goes smoothly without any conflicts.


Step 11: Turn the device off, making sure that it is powered down entirely.


Step 12: Turn the iPhone back on and wait until it loads all the way to the home screen. After the device gains a network connection, it should be with the carrier of the unofficial SIM card.
So there you have it. The steps themselves may seem in-depth or complex to new users, however, this is something that shouldn’t really need to be done unless the device has been restored and even then it should only take a few minutes if followed correctly.


(via iDownloadBlog)


Source : Redmond Pie